


Make DIY Smart Flower Plant Pot
We are people who work intensely or go to school every day. We can sometimes forget to water our beloved orchids on time.
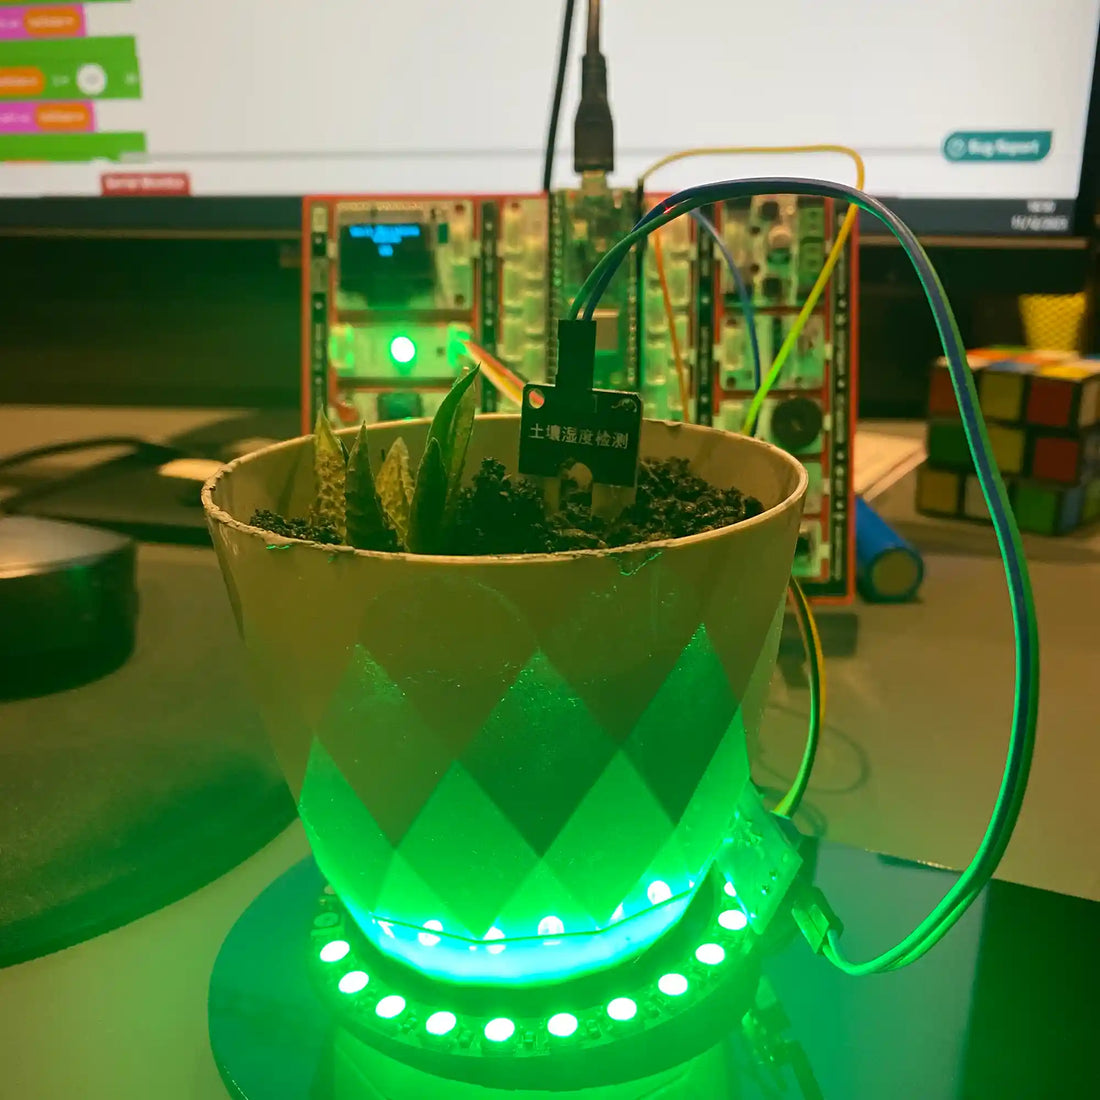
That's why I decided to develop this project. In this project, I will show you step by step how to make our IoT supported, smart plant pot using the Raspberry Pi kit PicoBricks. Let's get started.
Firstly, before starting to make your smart flower pot, you should learn how often your plant needs to be watered. You wouldn't want to water your plant too little and dry it out, or too much and kill it, right? :) I thought the same.
Features of the smart pot
- Instantly measures the moisture and temperature of the soil.
- Measured moisture information is displayed on the OLED screen.
- 12x addressable LEDs light up according to the moisture level in the soil.
- If the soil moisture drops below the level you set, the smart pot automatically waters.
Wiring Diagram

Required Components
- A plant pot
- Raspberry Pi
- Pump
- Water pipe
- Temperature and Humidity Sensor
- 12x Addressable Led
- OLED Screen
That's all. Moreover, if you have a PicoBricks IoT kit, it means you already have a temperature and humidity sensor, an OLED screen, a Raspberry Pi Pico W, and a pump. All you need to do is get a pot and LEDs.
How to Make a Smart Plant Pot Step by Step?
Now I will explain all the steps step by step, don't worry.
Step 1: Prepare All Materials
After getting all the materials listed above, pour suitable soil for your plant into your pot and place your plant in the soil. If you don't know how to do it, this guide can help you:
Place your ring LED in the center of your pot.
Insert the temperature and humidity sensor into the soil.
Connect the temperature and humidity sensor to your Raspberry Pi with a cable.
If you don't know how to do it, you can check out this guide:
How to connect Temperature sensor to Raspberry Pi?
If you have PicoBricks, you don't need to bother with cables and soldering. :)
Step 2: Load the Codes onto Your Raspberry Pi
Below you can find the necessary codes for this project.
We provided codes suitable for Thonny IDE and Arduino C. You can use whichever is more convenient for you.
If you have a PicoBricks and don't know how to load codes onto it, you can visit our page:
BricksIDE Codes

Python Codes
from time import sleep
from machine import PWM
from machine import Pin
from machine import ADC
from picobricks import WS2812
from machine import I2C
from picobricks import SSD1306_I2C
import math
import machine
import time

motor_1 = PWM(Pin(21))
motor_1.freq(50)
motor_1.duty_u16(0)
i2c = I2C(0, scl=Pin(5), sda=Pin(4), freq=200000)
oled = SSD1306_I2C(128, 64, i2c, addr=0x3c)
import math
adc_28 = machine.ADC(28)

while True:
    motor_1.duty_u16(0 * 650)
    ws2812 = WS2812((12), brightness = 1)
    ws2812.pixels_fill(((0), (0), (0)))
    ws2812.pixels_show()
    oled.fill(0)
    oled.text("{}".format("Soil Moisture "), 10, 0)
    oled.text("{}".format("Value"), 45, 10)
    soilMoistureValue = round(round( adc_28.read_u16() - 0 ) * ( 100 - 0 ) / ( 65535 - 0 ) + 0)
    ledState = round(round( soilMoistureValue - 0 ) * ( 12 - 0 ) / ( 100 - 0 ) + 0)
    print(ledState)
    oled.text("{}".format(soilMoistureValue), 55, 30)
    oled.show()
    if ledState == (0):
        ws2812 = WS2812((1), brightness = 1)
        ws2812.pixels_fill(((255), (0), (0)))
        ws2812.pixels_show()
        motor_1.duty_u16(100 * 650)
        time.sleep((1))
    if ledState <= (4):
        ws2812 = WS2812(ledState, brightness = 1)
        ws2812.pixels_fill(((255), (0), (0)))
        ws2812.pixels_show()
        motor_1.duty_u16(100 * 650)
        time.sleep((1))
    if ledState > (4) and ledState <= (8):
        ws2812 = WS2812(ledState, brightness = 1)
        ws2812.pixels_fill(((0), (0), (255)))
        ws2812.pixels_show()
        motor_1.duty_u16(100 * 650)
        time.sleep((0.5))
    if ledState > (10) and ledState <= (16):
        ws2812 = WS2812(ledState, brightness = 1)
        ws2812.pixels_fill(((0), (255), (0)))
        ws2812.pixels_show()
        motor_1.duty_u16(0 * 650)
    if ledState > (8) and ledState <= (12):
        ws2812 = WS2812(ledState, brightness = 1)
        ws2812.pixels_fill(((255), (0), (0)))
        ws2812.pixels_show()
        motor_1.duty_u16(0 * 650)
    time.sleep((1))
Arduino C Codes
#ifndef ACROBOTIC_SSD1306_H
#define ACROBOTIC_SSD1306_H

#if ARDUINO >= 100
 #include "Arduino.h"
#else
 #include "WProgram.h"
#endif

#ifdef __AVR__
  #include
  #define OLEDFONT(name) static const uint8_t __attribute__ ((progmem)) name[]
#elif defined(ESP8266)
  #include
  #define OLEDFONT(name) static const uint8_t name[]
#else
  #define pgm_read_byte(addr) (*(const unsigned char *)(addr))
  #define OLEDFONT(name) static const uint8_t name[]
#endif

#include "Wire.h"
#include "fonts/font8x8.h"
#include "fonts/font5x7.h"

// Default screen size is 128x64. Using a #define in your sketch before
// the #include statement can change the default size.

#if !defined SSD1306_128_64 && !defined SSD1306_128_32
  #define SSD1306_128_64
#endif

#if defined SSD1306_128_64
  #define SSD1306_Max_X                 127
  #define SSD1306_Max_Y                 63
#endif
#if defined SSD1306_128_32
  #define SSD1306_Max_X                 127
  #define SSD1306_Max_Y                 31
#endif

#define PAGE_MODE                     01
#define HORIZONTAL_MODE               02

#define SSD1306_Address               0x3C
#define SSD1306_Command_Mode          0x80
#define SSD1306_Data_Mode             0x40
#define SSD1306_Display_Off_Cmd       0xAE
#define SSD1306_Display_On_Cmd        0xAF
#define SSD1306_Normal_Display_Cmd    0xA6
#define SSD1306_Inverse_Display_Cmd   0xA7
#define SSD1306_Activate_Scroll_Cmd   0x2F
#define SSD1306_Dectivate_Scroll_Cmd  0x2E
#define SSD1306_Set_Brightness_Cmd    0x81

#define Scroll_Left                   0x00
#define Scroll_Right                  0x01

#define Scroll_2Frames                0x7
#define Scroll_3Frames                0x4
#define Scroll_4Frames                0x5
#define Scroll_5Frames                0x0
#define Scroll_25Frames               0x6
#define Scroll_64Frames               0x1
#define Scroll_128Frames              0x2
#define Scroll_256Frames              0x3

class ACROBOTIC_SSD1306 {
  public:
    char addressingMode;
    void init(TwoWire& wire=Wire);

    void setNormalDisplay();
    void setInverseDisplay();

    void sendCommand(unsigned char command);
    void sendData(unsigned char Data);

    void setPageMode();
    void setHorizontalMode();

    void setTextXY(unsigned char Row, unsigned char Column);
    void clearDisplay();
    void setBrightness(unsigned char Brightness);
    bool putChar(unsigned char c);
    void putString(const char *string);
    void putString(String string);
    unsigned char putNumber(long n);
    unsigned char putFloat(float floatNumber,unsigned char decimal);
    unsigned char putFloat(float floatNumber);
    void drawBitmap(unsigned char *bitmaparray,int bytes);

    void setHorizontalScrollProperties(
        bool direction,
        unsigned char startPage,
        unsigned char endPage,
        unsigned char scrollSpeed);
    void activateScroll();
    void deactivateScroll();

    void displayOn();
    void displayOff();

    void setFont(const uint8_t* font, bool inverse=false);

  private:
    const uint8_t* m_font;      // Current font.
    uint8_t m_font_offset = 2;  // Font bytes for meta data.
    uint8_t m_font_width;       // Font witdth.
    uint8_t m_col;              // Cursor column.
    uint8_t m_row;              // Cursor row (RAM).
    bool m_inverse=false;       // Inverse text.
    TwoWire* m_wire;
};

extern ACROBOTIC_SSD1306 oled;  // ACROBOTIC_SSD1306 object

#endif
MicroBlocks Codes

And that's it. Now you have a smart pot that automatically waters when needed and lets you instantly see the moisture level in your soil.
I hope you have liked our project. See you in other projects. Have a good day.
