


#10 Know Your Color Project With PicoBricks
LEDs are often used on electronic systems. Each button can have small LEDs next to each option. By making a single LED light up in different colors, it is possible to do the work of more than one LED with a single LED. LEDs working in this type are called RGB LEDs. It takes its name from the initials of the color names Red, Green, Blue. Another advantage of this LED is that it can light up in mixtures of 3 primary colors. Purple, turquoise, orange…
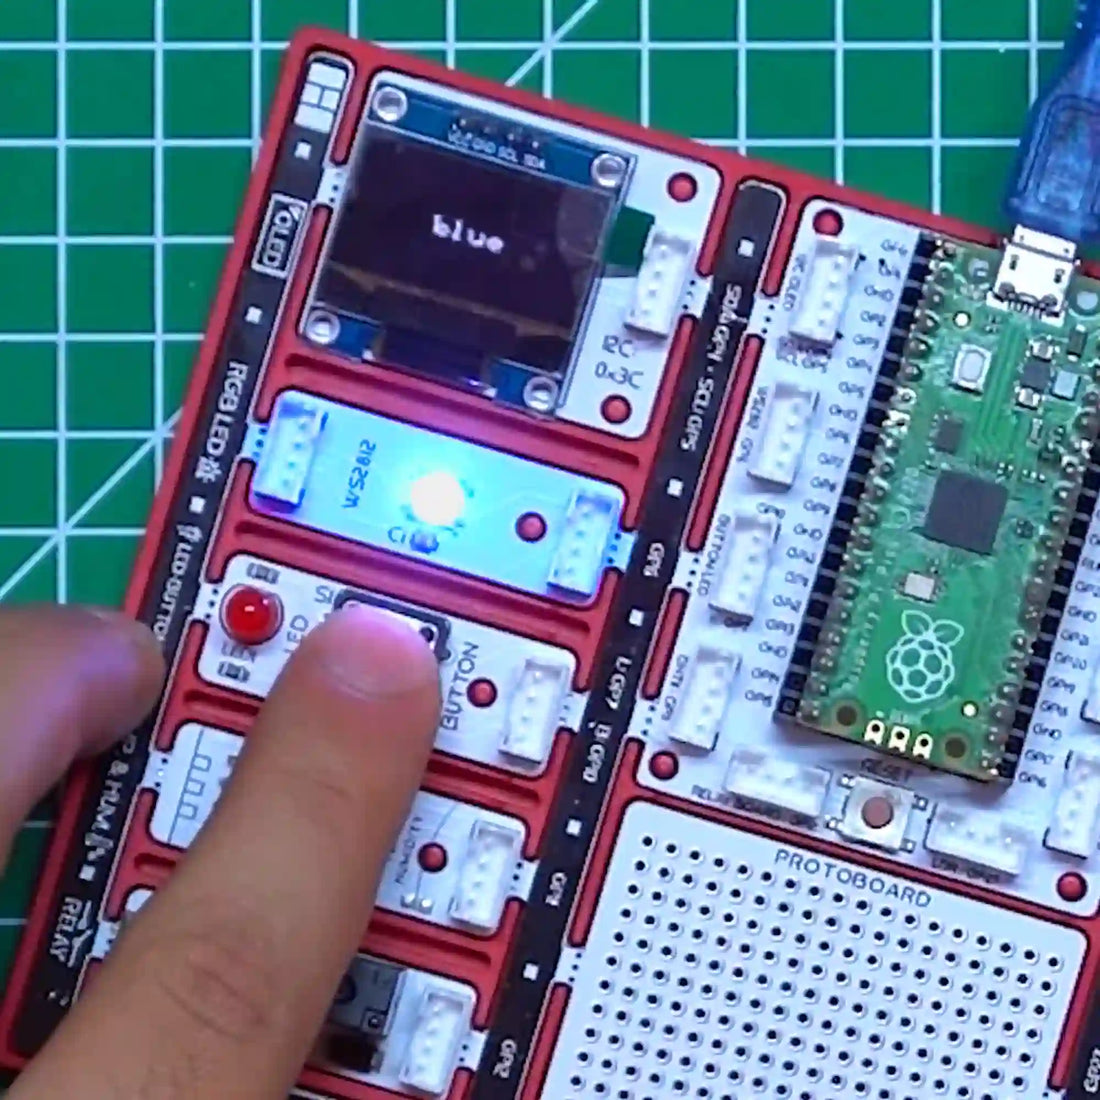
In this project you will learn about the randomness used in every programming language. We will prepare a enjoyable game with the RGB LED, OLED screen and button module of Picobricks.
In this project, we will create a timer alarm that adjusts for daylight using the light sensor in Picobricks.
Details and Algorithm
Wiring Diagram

MicroBlocks Codes of the PicoBricks
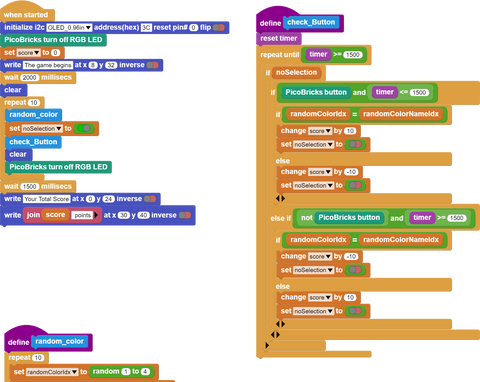
You can access the Microblocks codes of the project by click the button.
MicroPython Codes of the PicoBricks
from machine import Pin, I2C
from picobricks import SSD1306_I2C
import utime
import urandom
import _thread
from picobricks import WS2812

WIDTH  = 128
HEIGHT = 64
sda=machine.Pin(4)
scl=machine.Pin(5)
i2c=machine.I2C(0,sda=sda, scl=scl, freq=1000000)
ws = WS2812(pin_num=6, num_leds=1, brightness=0.3)

oled = SSD1306_I2C(WIDTH, HEIGHT, i2c)

button = Pin(10,Pin.IN,Pin.PULL_DOWN)
RED = (255, 0, 0)
GREEN = (0, 255, 0)
BLUE = (0, 0, 255)
WHITE = (255, 255, 255)
BLACK = (0, 0, 0)

oled.fill(0)
oled.show()

ws.pixels_fill(BLACK)
ws.pixels_show()

global button_pressed
score=0
button_pressed = False

def random_rgb():
    global ledcolor
    ledcolor=int(urandom.uniform(1,4))
    if ledcolor == 1:
        ws.pixels_fill(RED)
        ws.pixels_show()
    elif ledcolor == 2:
        ws.pixels_fill(GREEN)
        ws.pixels_show()
    elif ledcolor == 3:
        ws.pixels_fill(BLUE)
        ws.pixels_show()
    elif ledcolor == 4:
        ws.pixels_fill(WHİTE)
        ws.pixels_show()

def random_text():
    global oledtext
    oledtext=int(urandom.uniform(1,4))
    if oledtext == 1:
        oled.fill(0)
        oled.show()
        oled.text("RED",45,32)
        oled.show()
    elif oledtext == 2:
        oled.fill(0)
        oled.show()
        oled.text("GREEN",45,32)
        oled.show()
    elif oledtext == 3:
        oled.fill(0)
        oled.show()
        oled.text("BLUE",45,32)
        oled.show()
    elif oledtext == 4:
        oled.fill(0)
        oled.show()
        oled.text("WHITE",45,32)
        oled.show()

def button_reader_thread():
    while True:
        global button_pressed
        if button_pressed == False:
            if button.value() == 1:
                button_pressed = True
                global score
                global oledtext
                global ledcolor
                if ledcolor == oledtext:
                    score += 10
                else:
                    score -= 10
        utime.sleep(0.01)

_thread.start_new_thread(button_reader_thread, ())

oled.text("The Game Begins",0,10)
oled.show()
utime.sleep(2)

for i in range(10):
    random_text()
    random_rgb()
    button_pressed=False
    utime.sleep(1.5)
    oled.fill(0)
    oled.show()
    ws.pixels_fill(BLACK)
    ws.pixels_show()
utime.sleep(1.5)
oled.fill(0)
oled.show()
oled.text("Your total score:",0,20)
oled.text(str(score), 30,40)
oled.show()
Arduino Codes
#include <Adafruit_NeoPixel.h>
#define PIN        6
#define NUMPIXELS 1
Adafruit_NeoPixel pixels(NUMPIXELS, PIN, NEO_GRB + NEO_KHZ800);
#define DELAYVAL 500
#include <Wire.h>
#include "ACROBOTIC_SSD1306.h" //define libraries
int OLED_color;
int RGB_color;
int score = 0;
int button = 0;


void setup() {
  // put your setup code here, to run once:
  Wire.begin();
  oled.init();
  oled.clearDisplay();


  pixels.begin();
  pixels.clear();
  randomSeed(analogRead(27));

}

void loop() {
  // put your main code here, to run repeatedly:
  oled.clearDisplay();
  oled.setTextXY(3,1);
  oled.putString("The game begins");
  pixels.setPixelColor(0, pixels.Color(0, 0, 0));
  pixels.show();
  delay(2000);
  oled.clearDisplay();

  for (int i=0;i<10;i++){
    button = digitalRead(10);
    random_color();
    pixels.show();
    unsigned long start_time = millis();
    while (button == 0) {
        button = digitalRead(10);
        if (millis() - start_time > 2000)
          break;
    }
    if (button == 1){

        if(OLED_color==RGB_color){
          score=score+10;
        }
        if(OLED_color!=RGB_color){
          score=score-10;
        }
        delay(200);
    }
    oled.clearDisplay();
    pixels.setPixelColor(0, pixels.Color(0, 0, 0));
    pixels.show();
  }

  String string_scrore=String(score);
  oled.clearDisplay();
  oled.setTextXY(2,5);
  oled.putString("Score: ");
  oled.setTextXY(4,7);
  oled.putString(string_scrore);
  oled.setTextXY(6,5);
  oled.putString("points");
  // print final score on OLED screen

  delay(10000);
}

void random_color(){

  OLED_color = random(1,5);
  RGB_color = random(1,5);
  // generate numbers between 1 and 5 randomly and print them on the screen
    if (OLED_color == 1){
      oled.setTextXY(3,7);
      oled.putString("red");
  }
    if (OLED_color == 2){
      oled.setTextXY(3,6);
      oled.putString("green");
  }
    if (OLED_color == 3){
      oled.setTextXY(3,6);
      oled.putString("blue");
  }
    if (OLED_color == 4){
      oled.setTextXY(3,6);
      oled.putString("white");
  }
    if (RGB_color == 1){
      pixels.setPixelColor(0, pixels.Color(255, 0, 0));
  }
    if (RGB_color == 2){
      pixels.setPixelColor(0, pixels.Color(0, 255, 0));
  }
    if (RGB_color == 3){
      pixels.setPixelColor(0, pixels.Color(0, 0, 255));
  }
    if (RGB_color == 4){
      pixels.setPixelColor(0, pixels.Color(255, 255, 255));
  }


}

