


Step by Step Hommade Make Mouse Jiggler
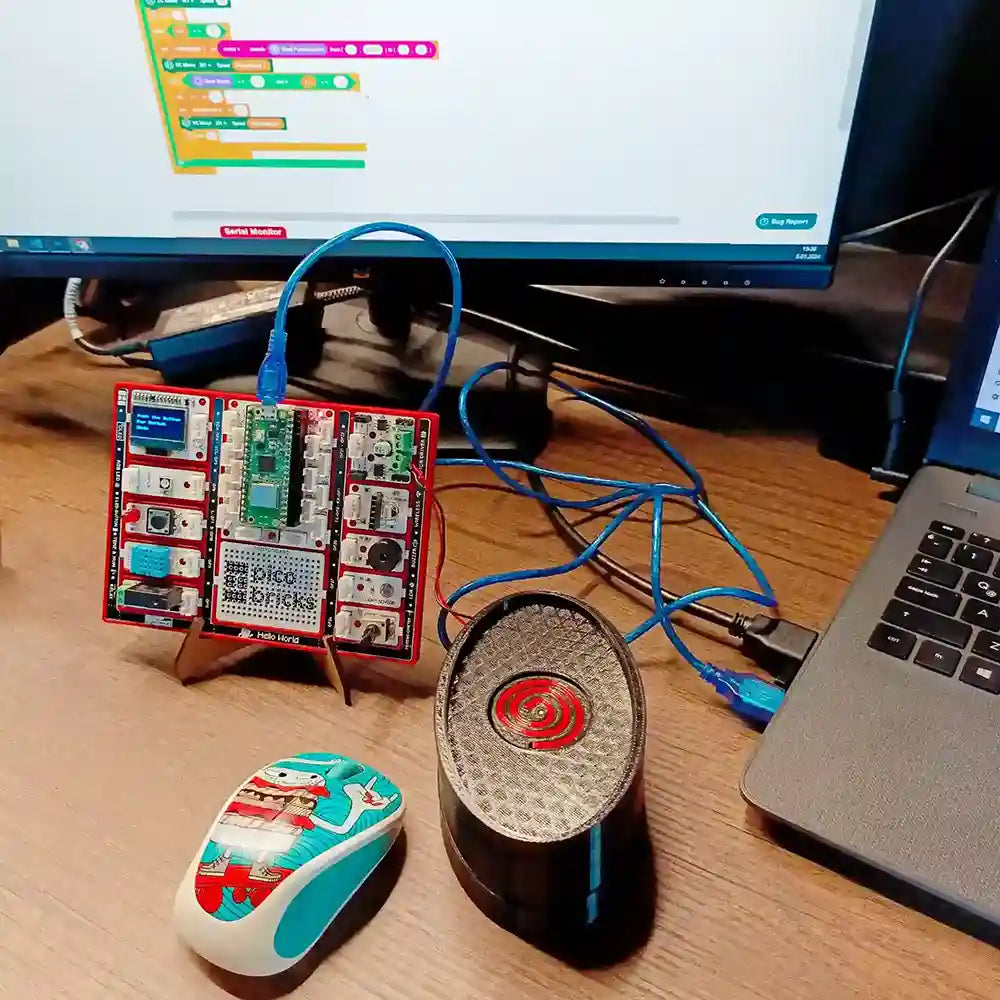
Ever found yourself needing to keep your computer awake but didn't want to resort to the same old software solutions? Well, dear reader, let me take you on a journey through the creation of a hardware-based, homemade mouse jiggler using the versatile Picobricks kit. It's a tale of ingenuity, fun, and a bit of DIY magic!
How to Make Own Mouse Jiggler with Raspberry Pi Pico
Our story begins with the unassuming yet powerful Raspberry Pi Pico at the heart of our project. This tiny board, when combined with Picobricks, turns into a DIY powerhouse. But what exactly is a mouse jiggler, you ask? It's a device that simulates mouse movements, keeping your computer awake and bustling with virtual life, even when you're not there!

Components
- Button
- OLED Screen
- DC Motor
- Motor Driver
- Potentiometer
Blueprint of Our Creation

Lets Coding with Python
First, let's dive into building our mouse jiggler with BricksIDE. This friendly environment makes coding as easy as pie. I'll walk you through each step, peppering in bits of code and a dash of humor to keep things interesting.
Block Coding with Bricks IDE

ThonnyPython Codes
But what if you're more of a Python enthusiast? Fret not! ThonnyPython comes to our rescue. With its straightforward interface, coding our mouse jiggler becomes a breezy affair.
    from time import sleep
from machine import Pin
from machine import I2C
from picobricks import SSD1306_I2C
import machine
from machine import PWM
from machine import ADC
import time
import math

i2c = I2C(0, scl=Pin(5), sda=Pin(4), freq=200000)
oled = SSD1306_I2C(128, 64, i2c, addr=0x3c)
pin_button = machine.Pin(10, machine.Pin.IN)
motor_1 = PWM(Pin(21))
motor_1.freq(50)
motor_1.duty_u16(0)
import math
pot = machine.ADC(26)

a = 0
while True:
    oled.fill(0)
    oled.text("{}".format("Push The Button"), 5, 15)
    oled.text("{}".format("For Switch"), 5, 30)
    oled.text("{}".format("Mode"), 5, 45)
    oled.show()
    if (pin_button.value()) == (1) and a == (0):
        a = 1
        motor_1.duty_u16(40 * 650)
        time.sleep((1))
        while a == (1):
            MotorSpeed = round(round( pot.read_u16() - 0 ) * ( 25 - 15 ) / ( 65535 - 0 ) + 15)
            motor_1.duty_u16(MotorSpeed * 650)
            while (pin_button.value()) == (1) and a == (1):
                a = 0
                MotorSpeed = 0
                motor_1.duty_u16(MotorSpeed * 650)
                time.sleep((1))


14
Arduino C Codes
And for those who prefer the classic taste of Arduino C, we've got you covered too. Let's explore how to bring our mouse jiggler to life using this evergreen language.
#include <stdio.h>
#include "ACROBOTIC_SSD1306.h"
#include <Wire.h>
#define BUTTON_PIN 10

const int motorPin = 21;
const int potPin = 26;

bool motorState = false;

void stopMotor() {
  analogWrite(motorPin, 0);
  oled.clearDisplay();
  oled.setTextXY(1, 1);
  oled.putString("Push The Button");
  oled.setTextXY(3, 3);
  oled.putString("For Switch");
  oled.setTextXY(5, 6);
  oled.putString("Mode");
}

void setup() {
  Serial.begin(9600);
  pinMode(BUTTON_PIN, INPUT);
  pinMode(motorPin, OUTPUT);
  Wire.begin();
  oled.init();
  oled.clearDisplay();
  oled.setTextXY(1, 4);
  oled.putString("Mouse");
  oled.setTextXY(2, 6);
  oled.putString("Mover");
  oled.setTextXY(5,2);
  oled.putString("Press Button");
  oled.setTextXY(6,5);
  oled.putString("For AFK");
}

void loop() {
  int motorSpeed = 40;
  if (digitalRead(BUTTON_PIN) == HIGH) {
    motorState = true;
    delay(100);
    oled.clearDisplay();
  }

  while(motorState == true) {
    if (motorSpeed == 40) {

      analogWrite(motorPin, motorSpeed * 2.5);
      delay(1000);
      motorSpeed = 0;
    } else {

      motorSpeed = map(analogRead(potPin), 0, 1023, 15, 25);
      analogWrite(motorPin, motorSpeed * 2.5);
    oled.setTextXY(1, 2);
    oled.putString("You Are Now ");
    oled.setTextXY(4, 6);
    oled.putString("AFK");
    }
    if (digitalRead(BUTTON_PIN) == HIGH) {
      motorState = false;
      oled.clearDisplay();
      stopMotor();
      delay(300);
    }
 }
}
And Mouse Mover 3D STL Files
Now, for the pièce de résistance! We're adding a 3D-printed enclosure to our project. This isn't just any box; it's a custom-designed home for our mouse jiggler. It cleverly hides the motor and creates a perfect playground for our mouse.
Download the 3D STL File HereFAQs
How does a mouse jiggler help?
A mouse jiggler keeps your computer awake by simulating mouse movements. It's perfect for those long downloads or updates!
Is it complicated to make a DIY mouse jiggler?
Not at all! With basic components and a little guidance, anyone can create their own mouse jiggler. It's a fun and practical project!
Can I use any other microcontrollers apart from Raspberry Pi Pico?
Yes, but this guide focuses on the Raspberry Pi Pico. Feel free to experiment with others and share your results!
