


Labyrinth Game
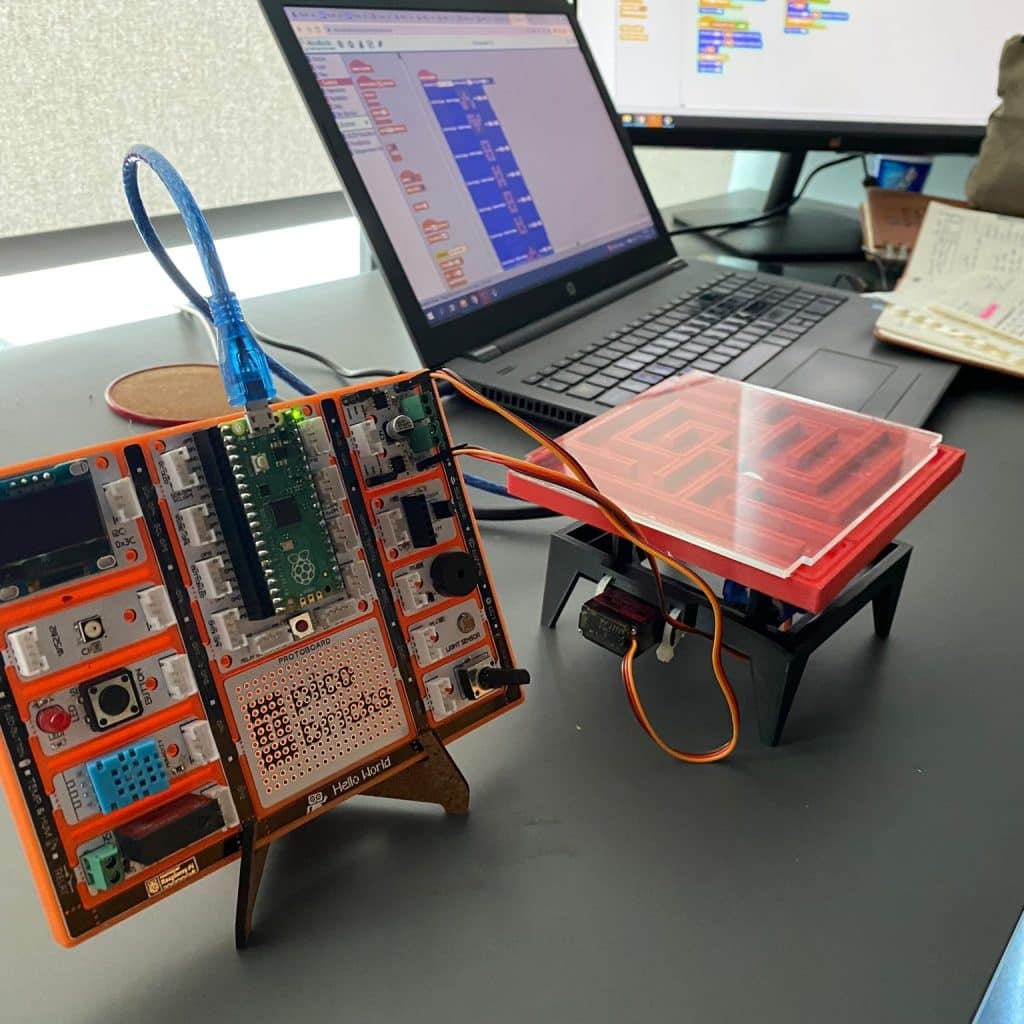
Table of Contents
Your imagination is the limit of what you can do with PicoBricks!
With PicoBricks, you can create most games you want using your creativity. For example, making labyrinth games can be pretty fun. With the new version PicoBricks, you can control it with a remote control!
If we need to talk about the maze game and how it should be played; players have ability to control the movement of the ball’s movement with a remote control or comparable device, with the goal of reaching a hole or target point. As they navigate through the maze game, players maintain the ball’s balance and overcome obstacles, all while aiming to expertly guide the ball to its destination. The maze game demand focus, hand-eye coordination, and patience, providing players with an immersive and rewarding experience.
Details and Algorithm
We’ve specifically crafted the labyrinth game to offer wireless control over a servo motor using PicoBricks and an IR receiver. Our program is engineered to spot signals sent from an IR remote control and then instruct the servo motor to perform various actions such as moving up, down, left, right, or stopping—based on these signals.
We’ve meticulously calculated the servo motor’s angles and translated them into precise positions by employing a PWM (Pulse Width Modulation) signal. Our program not only serves as a fundamental example for automation projects and remote-controlled devices but also includes a mechanical design generated through a 3D printer. Those interested can delve into the code to gain an in-depth understanding of its functionality and utilize it for similar projects.
If you prefer, you can create your own maze game and print it on your 3D printer, or you can download the STL file and print it on your 3D printer using the download button below.
DOWNLOADWiring Diagram

MicroBlocks Codes of PicoBricks

PicoBlockly Codes of PicoBricks

MicroPython Codes of PicoBricks
The MicroPython code is shown below. Remember to set the degree and degree2 values when coding, as the servos may be connected differently.
from time import sleep
from machine import Pin
from machine import PWM
from math import fabs
from picobricks import NEC_16
from picobricks import IR_RX

pwm_1 = PWM(Pin(21))
pwm_1.freq(50)

def CalculateAngle(angle):
    angle = fabs((angle * (6000 / 180)) + 2000)
    angle = round(angle)
    return angle

pwm_2 = PWM(Pin(22))
pwm_2.freq(50)

def ir_callback(data, addr, ctrl):
    global ir_data
    global ir_addr, data_rcvd
    if data > 0:
        ir_data = data
        ir_addr = addr
        print('Data {:02x} Addr {:04x}'.format(data, addr))
        data_rcvd = True

ir = NEC_16(Pin(0, Pin.IN), ir_callback)
ir_data = 0
data_rcvd = False

degree1 = 60
degree2 = 55
i = 0
pwm_1.duty_u16(CalculateAngle(degree1))
pwm_2.duty_u16(CalculateAngle(degree2))

def up():
    global degree1, degree2, i
    if degree1 >= 87:
        degree1 = 85
    for count in range(3):
        degree1 += 1
        pwm_2.duty_u16(CalculateAngle(degree1))

def left():
    global degree1, degree2, i
    if degree2 >= 79:
        degree2 = 75
    for count in range(3):
        degree2 += 1
        pwm_1.duty_u16(CalculateAngle(degree2))

def down():
    global degree1, degree2, i
    if degree1 <= 31:
        degree1 = 35
    for count in range(3):
        degree1 -= 1
        pwm_2.duty_u16(CalculateAngle(degree1))

def right():
    global degree1, degree2, i
    if degree2 <= 39:
        degree2 = 46
    for count in range(3):
        degree2 -= 1
        pwm_1.duty_u16(CalculateAngle(degree2))

def stop():
    global degree1, degree2, i
    degree1 = 60
    degree2 = 55
    pwm_1.duty_u16(CalculateAngle(degree1))
    pwm_2.duty_u16(CalculateAngle(degree2))

while True:
    if data_rcvd == True:
        data_rcvd = False
        if ir_data == IR_RX.number_up:
            up()
        elif ir_data == IR_RX.number_down:
            down()
        elif ir_data == IR_RX.number_left:
            left()
        elif ir_data == IR_RX.number_right:
            right()
        elif ir_data == IR_RX.number_ok:
            stop()
Arduino C Codes of PicoBricks
#include <DHT.h>
#include <Servo.h>
#include <IRremote.h>
#include <IRremote.hpp>
#include <Wire.h>

#define IR_RECEIVE_PIN 0

Servo servo1;
Servo servo2;

int angle1 = 60;
int angle2 = 55;

void setup() {
  Serial.begin(9600);
  Wire.begin();
  pinMode(IR_RECEIVE_PIN, INPUT);
  IrReceiver.begin(IR_RECEIVE_PIN, ENABLE_LED_FEEDBACK);
  servo1.attach(21);
  servo2.attach(22);

  servo1.write(angle1);
  servo2.write(angle2);
}

void loop() {
  if (IrReceiver.decode()) {
    int a = (IrReceiver.decodedIRData.decodedRawData);
    Serial.println(a);
    IrReceiver.resume();
    // If up button is pressed
    if (a == -417792256) {
      up();
    }
    // If down button is pressed
    else if (a == -1387069696) {
      down();
    }
    // If left button is pressed
    else if (a == -1520763136) {
      left();
    }
    // If right button is pressed
    else if (a == -150405376) {
      right();
    }
    // If ok button is pressed
    else if (a == -484638976) {
      stoop();
    }
  }
}

void up() {
  if (angle1 >= 87) {
    angle1 = 85;
  }
  for (int i = 0; i <= 3; i++) {
    angle1 += 1;
    servo2.write(angle1);
  }
}

void down() {
  if (angle1 <= 31) {
    angle1 = 35;
  }
  for (int i = 0; i <= 3; i++) {
    angle1 -= 1;
    servo2.write(angle1);
  }
}

void left() {
  if (angle2 >= 79) {
    angle2 = 75;
  }
  for (int i = 0; i <= 3; i++) {
    angle2 += 1;
    servo1.write(angle2);
  }
}

void right() {
  if (angle2 <= 39) {
    angle2 = 46;
  }
  for (int i = 0; i <= 3; i++) {
    angle2 -= 1;
    servo1.write(angle2);
  }
}

void stoop() {
  angle1 = 60;
  angle2 = 55;
  servo1.write(angle2);
  servo2.write(angle1);
}
