


DIY Weather Station Project
What Will You Achieve in This IoT Project?
By programming different sensors;
- You will measure temperature and humidity at 1 second intervals. In this way, nothing will escape the eyes of your weather station.
- The measured values will be instantly transferred to the Thinspeak environment. You will be able to create your own graphs and maps in Thinspeak. Just like a meteorologist.
- When the air temperature rises above 25 degrees Celsius, your RGB LED will light up red, between 10 and 25 degrees yellow, 10 degrees and below blue.
- When it drops below 4 degrees, you will receive a "There is a danger of icing" warning on your OLED screen. You will also hear a warning tone from your buzzer module. In this way, you will be able to detect possible frost disasters in advance.
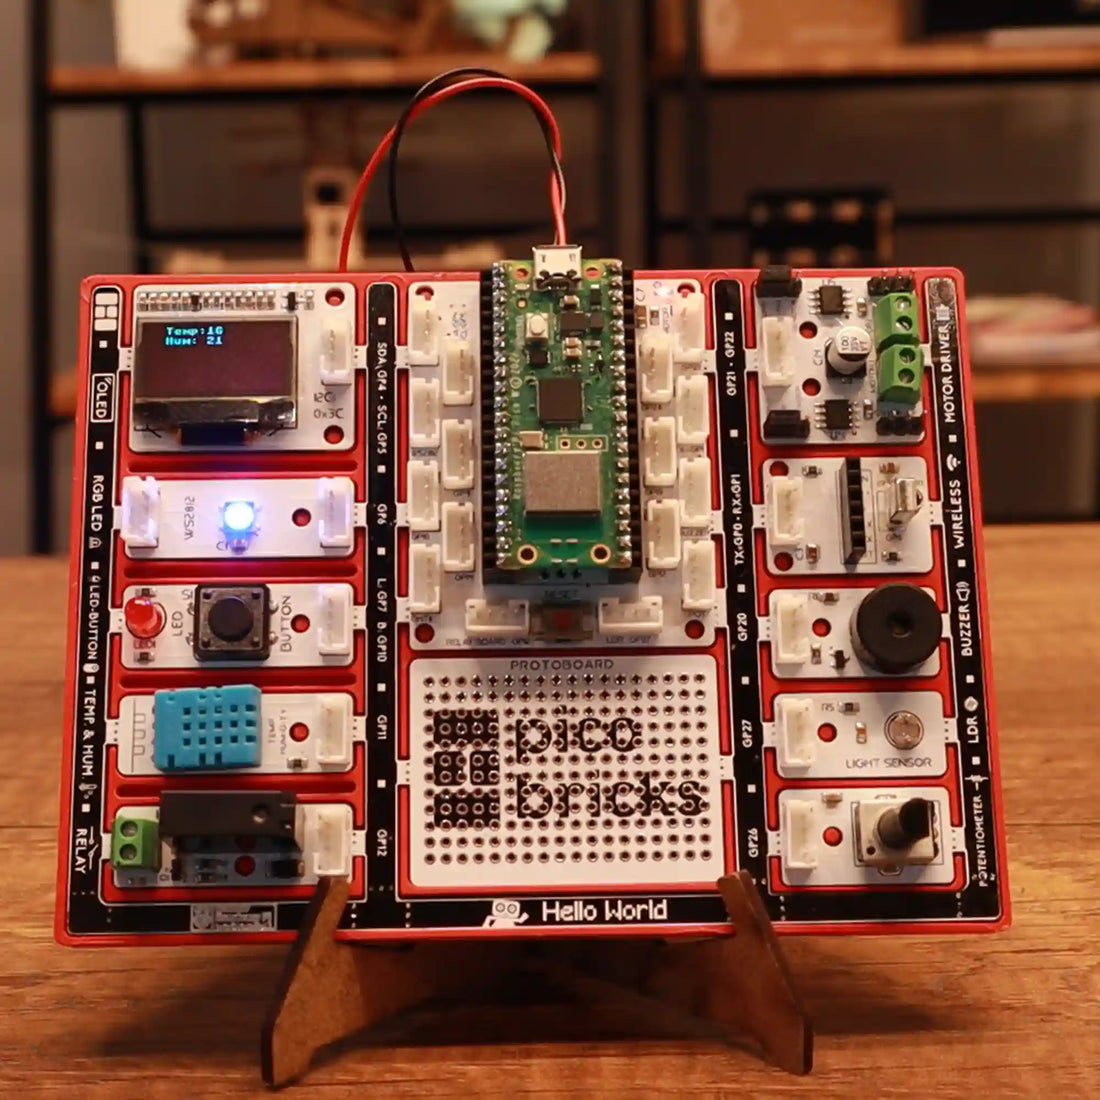
Components
- OLED Screen
- RGB LED
- Temperature And Humidity Sensor
Wiring Diagram

Step by Step Build Your Own Weather Station
Step 1
ThingSpeak is a platform used to collect, store and analyze data over the internet. It is especially used to store and analyze data generated by IoT (Internet of Things) devices.
Before writing our code, we need to log in to the Thingspeak environment. I recommend recording the Time Region section correctly because it is important to ensure that the time information we store graphically is compatible with the data we send later.
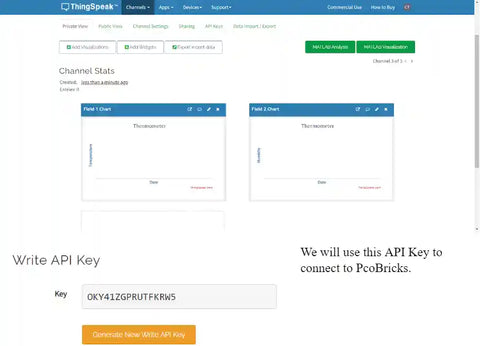
After registration, when the My Channels option is selected from the Channels menu at the top, a menu like the one below appears.

When you come to this menu, click on the New Channel tab and we are ready to open a new channel with the menu like the below that appears.

Name tag is the name you will give to your data. If you want, you can enter a description for your project in the Description tag.
For this project, we will use Field 1 and Field 2 tags. We will name Field 1 tag as temperature and Field 2 tag as humidity. These fields will show the temperature and humidity measurements we received from our sensor.
You do not need to use other tags in this project.
When you click the Save Channel button below, our channel will be created.

Here is our channel. To connect our channel to PicoBricks, enter the API Keys tab.
Step 2
Let’s write the code.
We will use the network library to connect to the internet and the urequest library to send data to thingspeak.
# Control an LED and read a Button using a web browser
import time
import network
from machine import Pin,PWM,ADC
from picobricks import SSD1306_I2C,WS2812, DHT11,NEC_16, IR_RX
from utime import sleep
import utime
import urequests

THINGSPEAK_WRITE_API_KEY = 'OKY41ZGPRUTFKRW5'
HTTP_HEADERS = {'Content-Type': 'application/json'}

buzzer = PWM(Pin(20))

WIDTH = 128
HEIGHT = 64
sda=machine.Pin(4)
scl=machine.Pin(5)
i2c=machine.I2C(0,sda=sda, scl=scl, freq=1000000)
oled = SSD1306_I2C(WIDTH, HEIGHT, i2c)

ws = WS2812(6, brightness=0.4)
ws.pixels_fill((0 ,0 ,0 ))
ws.pixels_show()

pico_temp=DHT11(Pin(11, Pin.IN, Pin.PULL_UP))
current_time=utime.time()
utime.sleep(1)

ssid = "dsmart_1811"
password = "SeVgI11036706012018"

wlan = network.WLAN(network.STA_IF)
wlan.active(True)
wlan.connect(ssid, password)

oled.text("Power On",30,0)
oled.text("Waiting for ",20, 30)
oled.text("Connection",23, 40)
oled.show()
time.sleep(2)
oled.fill(0)


# Wait for connect or fail
max_wait = 10
while max_wait > 0:
    if wlan.status() < 0 or wlan.status() >= 3:
        break
    max_wait -= 1
    print('waiting for connection...')
    time.sleep(1)

# Handle connection error
if wlan.status() != 3:
    raise RuntimeError('network connection failed')
else:
    print('Connected')

temperature=0
humidity=0

while True:
    oled.fill(0)

    if(utime.time() - current_time > 2):
        current_time = utime.time()
        try:
            pico_temp.measure()
        except:
            print("measurement failed, will try again soon")

    oled.fill(0)#clear OLED
    oled.show()


    temperature=pico_temp.temperature
    humidity=pico_temp.humidity

    oled.text("Temp: ",15,0)#print "Temperature: " on the OLED at x=15 y=10
    oled.text(str(int(temperature)),55,0)
    oled.text("Hum: ", 15,10)
    oled.text(str(int(humidity)),55,10)
    oled.show()#show on OLED
    utime.sleep(0.5)#wait for a half second

    dht_readings = {'field1':temperature, 'field2':humidity}
    request = urequests.post( 'http://api.thingspeak.com/update?api_key=' + THINGSPEAK_WRITE_API_KEY, json = dht_readings, headers = HTTP_HEADERS )
    request.close()
    print(dht_readings)

    if(temperature >= 25):
        ws.pixels_fill((255, 0, 0))
        ws.pixels_show()
    elif(temperature > 10 and temperature < 25):
        ws.pixels_fill((255, 255, 0))
        ws.pixels_show()
    elif(temperature <= 10):
        ws.pixels_fill((0, 0, 255))
        ws.pixels_show()

    if (temperature < 4 ):
        oled.text("There is a danger of icing")
        for i in range((3)):
            buzzer.duty_u16(2000)
            buzzer.freq(831)
            time.sleep(0.25)

    buzzer.duty_u16(0)
    time.sleep(0.25)
Step 3: Explain Code

We will use the network library to connect to the internet and the urequest library to send data to thingspeak.

We assign the API Key I mentioned above to the value THINGSPEAK_WRITE_API_KEY. appointments are being made for büzer, OLED and DHT11. We assign the internet name to the "ssid" value and the internet password to the "password" value. We write the codes for it
to connect to the internet.

We wait for it to connect to the internet and take precautions for any errors, if any.

Before entering the loop, we assign 0 values for temperature and humidty. Temperature and humidity measurements are taken within the loop and printed on the screen.
Here’s the key part:

Thanks to these codes, we can send data to thinspeak. We assign the “dht_readings” value to a dicitonary value as field1 and field2 that we created in thinspeak. Inside the “urequest.post” command we assigned , respectively, we write the internet address we want to send data to, the API Key of that address, if any, the data we will send and the internet assignments and the internet assignments. We send the data to the internet with the “urequest.post” command.

Finally, we assign the temperature values according to what we want them to do according to the ranges we want.

