


#18 Smart House Project With PicoBricks

Workplaces, factories, homes and even animal shelters… There are different electronic systems that can be used to protect our living spaces against intruders. These systems are produced and marketed as home and workplace security systems. There are systems where the images produced by security cameras are processed and interpreted, as well as security systems that detect the human body and its movements with sensors and take action. Security systems are set up like a kind of alarm clock and give audible and visual warnings when an unidentified activity is detected in the specified zone. It notifies the business or the homeowner, and it can also make automatic notifications to the security companies.
In cases of gas leakage, fire etc., gas sensors are used in homes and workplaces to prevent poisoning. In a problem situation, people living in the environment are alerted by a loud alarm.
We will prepare a model smart home project with PicoBricks using the HC-SR501 and MQ-2 gas sensor. This sensor HC-SR501, is also known as PIR sensor. Passive infrared (PIR) sensors use a pair of pyroelectric sensors to detect heat energy in the surrounding environment. These two sensors sit beside each other, and when the signal differential between the two sensors changes (if a person enters the room, for example), the sensor will engage.
Details and Algorithm
1X PicoBricks
1X HC-SR501 PIR sensor
1X MQ-2 Gas sensor
1X Mini breadboard
Jumper Cables
Easy Connection Cables
Wiring Diagram

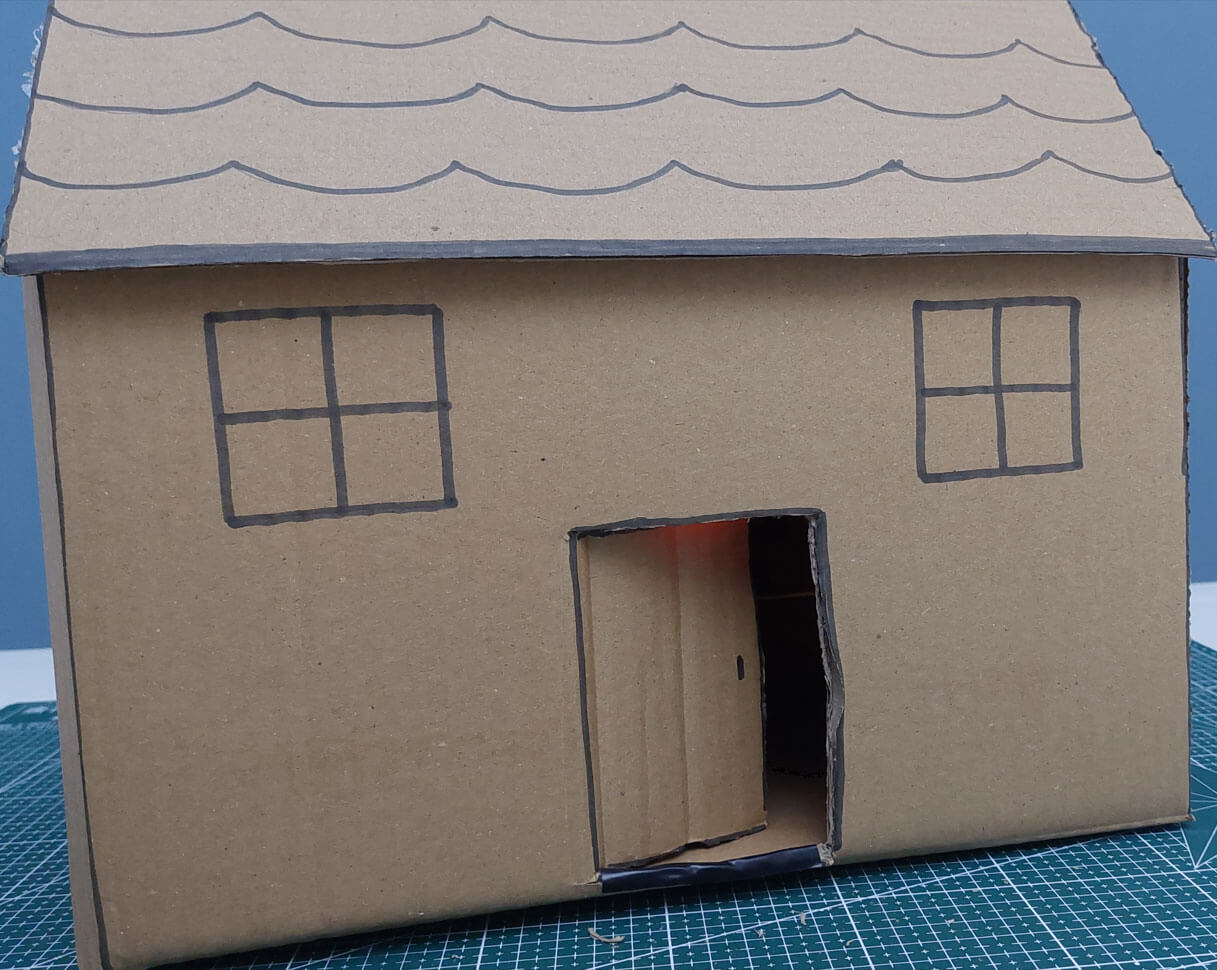
To run the project, you have to turn a cardboard box into a model house. You will need scissors, pencils, tape, glue, and a utility knife. Draw windows and doors on the box with a pencil. Cut the door section with a utility knife.

You can use another cardboard to make the roof part.

Attach double-sided foam tape under the PicoBricks pieces.

Place pieces of PicoBricks inside the model house. Position the PIR sensor to see the door directly from the inside. attach the button module just above the door from the inside.

When you connect the battery case to Picoboard and turn it on, the code will start to run. 3 seconds after pressing the button, the alarm system will be activated and the red LED will turn on. As soon as you put your hand in the door, the buzzer will start to sound.

When you hold the lighter gas inside the house, the alarm system is expected to be activated again.
MicroBlocks Codes of the PicoBricks

You can access the Microblocks codes of the project by dragging the image to the Microblocks Run tab or click the button.
MicroPython Codes of the PicoBricks
import time
import network
import socket
from machine import Pin, ADC
from picobricks import SSD1306_I2C, DHT11
from time import sleep
WIDTH = 128
HEIGHT = 64
sda=machine.Pin(4)
scl=machine.Pin(5)
i2c=machine.I2C(0,sda=sda, scl=scl, freq=1000000)
oled = SSD1306_I2C(WIDTH, HEIGHT, i2c)

motor_1 = Pin(21, Pin.OUT)
motor_2 = Pin(22, Pin.OUT)

smo_sensor=ADC(27)
dht_sensor = DHT11(Pin(11))
dht_read_time = time.time() # Defined a variable to keep last DHT11 read time

#Connect to Wifi
ssid = "WiFi ID"
password = "WiFi Password"
wlan = network.WLAN(network.STA_IF)
wlan.active(True)
wlan.connect(ssid, password)
max_wait = 10
status = wlan.ifconfig()

oled.text("Power On",30,0)
oled.text("Waiting for ",20, 30)
oled.text("Connection",23, 40)
oled.show()

while max_wait > 0:
    if wlan.status() < 0 or wlan.status() >= 3:
        break
    max_wait -=1
    print("waiting for connection...")
    time.sleep(1)

if wlan.status() !=3:
    print('network connection failed. Please Check ID and PASSWORD')
else:
    print('connected')
    status = wlan.ifconfig()
    print( 'ip = ' + status[0] )


oled.fill(0)


html = """<!DOCTYPE html><html>
<head><meta name="viewport" content="width=device-width, initial-scale=1">
<link rel="icon" href="data:,">
<style>html { font-family: Helvetica; display: inline-block; margin: 0px auto; text-align: center;}
.buttonBlue { background-color: #0000FF; border: 2px solid #000000;; color: white; padding: 20px 32px; text-align: center; text-decoration: none; display: inline-block; font-size: 16px; margin: 4px 2px; cursor: pointer; }
.buttonOrange { background-color: #FFA500; border: 2px solid #000000;; color: Black; padding: 20px 32px; text-align: center; text-decoration: none; display: inline-block; font-size: 16px; margin: 4px 2px; cursor: pointer; }
text-decoration: none; font-size: 30px; margin: 2px; cursor: pointer;}
</style></head>
<body><center><h1>Smart Green House</h1></center><br><br>
<form><center>
<center> <button class="buttonBlue" name="watering" value="watering" type="submit">WATERING</button>
<br><br>
<center> <button class="buttonOrange" name="check" value="status" type="submit">Check Status</button>
</form>
<br><br>
<br><br>
<p>%s<p></body></html>
"""
html2 = """<!DOCTYPE html><html>
<head><meta name="viewport" content="width=device-width, initial-scale=1">
<link rel="icon" href="data:,">
<body><center></center>
<form></form>

<p>%s<p></body></html>
"""

# Open socket
addr = socket.getaddrinfo('0.0.0.0', 80)[0][-1]
s = socket.socket()
s.bind(addr)
s.listen(1)
print('listening on', addr)
oled.text("IP",50, 0)
oled.text(str(status[0]),20, 20)
oled.text("Connected",25, 40)
oled.show()
# Listen for connections, serve client
tempexp = str()
humexp = str()
soilexp = str()
while True:

    if time.time() - dht_read_time >= 3:
        dht_read_time = time.time()
        try:
            dht_sensor.measure()
        except Exception as e:
            pass
    try:
        cl, addr = s.accept()
        print('client connected from', addr)
        request = cl.recv(1024)
        print("request:")
        print(request)
        request = str(request)
        watering = request.find('watering')
        checkstt = request.find('check')

        print( 'watering = ' + str(watering))
        print( 'checkstt = ' + str(checkstt))

        if watering == 8: # Sulama
            print("watering")
            motor_1.high()
            motor_2.high()
            sleep(1)
            motor_1.low()
            motor_2.low()
            if watering == 8:
                dhtstt = "Watering for 1 sec..."
        else: # Info
            smo=round((smo_sensor.read_u16()/65535)*100)
            temp=dht_sensor.temperature
            hum=dht_sensor.humidity
            dhtstt = "VALUES"
            soilstt = "Soil Sensor Value: "
            soilexp = str(smo) + "%"
            humexp = "Huminity: " +  str(hum) + "% "
            tempexp = "Temperature: "+ str(temp) + "% "

        # Create and send response
        stateis2 = tempexp + humexp + " Soil: " + soilexp
        stateis = dhtstt
        response2 = html2 % stateis2
        response = html % stateis
        cl.send('HTTP/1.0 200 OK\r\nContent-type: text/html\r\n\r\n')
        cl.send(response)
        cl.send(response2)
        cl.close()

    except OSError as e:
        cl.close()
        print('connection closed')
Arduino C Codes of the PicoBricks
#include <DHT.h>
#define RX 0
#define TX 1

#define LIMIT_TEMPERATURE     30
#define DHTPIN                11
#define DHTTYPE               DHT11
#define smo_sensor            27
#define motor                 22
#define DEBUG true

DHT dht(DHTPIN, DHTTYPE);
int connectionId;

void setup() {
  Serial1.begin(115200);
  dht.begin();
  pinMode(smo_sensor, INPUT);
  pinMode(motor, OUTPUT);

  sendData("AT+RST\r\n", 2000, DEBUG); // reset module
  sendData("AT+GMR\r\n", 1000, DEBUG); // configure as access point
  sendData("AT+CIPSERVER=0\r\n", 1000, DEBUG); // configure as access point
  sendData("AT+RST\r\n", 1000, DEBUG); // configure as access point
  sendData("AT+RESTORE\r\n", 1000, DEBUG); // configure as access point
  sendData("AT+CWMODE?\r\n", 1000, DEBUG); // configure as access point
  sendData("AT+CWMODE=1\r\n", 1000, DEBUG); // configure as access point
  sendData("AT+CWMODE?\r\n", 1000, DEBUG); // configure as access point
  sendData("AT+CWJAP=\"WIFI_ID\",\"WIFI_PASSWORD\"\r\n", 5000, DEBUG); // ADD YOUR OWN WIFI ID AND PASSWORD
  delay(3000);
  sendData("AT+CIFSR\r\n", 1000, DEBUG); // get ip address
  delay(3000);
  sendData("AT+CIPMUX=1\r\n", 1000, DEBUG); // configure for multiple connections
  delay(1000);
  sendData("AT+CIPSERVER=1,80\r\n", 1000, DEBUG); // turn on server on port 80
  delay(1000);
}

void loop() {
  if (Serial1.find("+IPD,")) {
    delay(300);
    connectionId = Serial1.read() - 48;
    String serialIncoming = Serial1.readStringUntil('\r');
    Serial.print("SERIAL_INCOMING:");
    Serial.println(serialIncoming);

    if (serialIncoming.indexOf("/WATERING") > 0) {
      Serial.println("Irrigation Start");
      digitalWrite(motor, HIGH);
      delay(1000); // 10 sec.
      digitalWrite(motor, LOW);
      Serial.println("Irrigation Finished");
      Serial.println("! Incoming connection - sending WATERING webpage");
      String html = "";
      html += "<html>";
      html += "<body><center><H1>Irrigation Complete.<br/></H1></center>";
      html += "</body></html>";
      espsend(html);
    }
    if (serialIncoming.indexOf("/SERA") > 0) {
      delay(300);

      float smo = analogRead(smo_sensor);
      float smopercent = (460-smo)*100.0/115.0 ; //min ve max değerleri değişken.
      Serial.print("SMO: %");
      Serial.println(smo);

      float temperature = dht.readTemperature();
      Serial.print("Temp: ");
      Serial.println(temperature);

      float humidity = dht.readHumidity();
      Serial.print("Hum: ");
      Serial.println(humidity);

      Serial.println("! Incoming connection - sending SERA webpage");
      String html = "";
      html += "<html>";
      html += "<body><center><H1>TEMPERATURE<br/></H1></center>";
      html += "<center><H2>";
      html += (String)temperature;
      html += " C<br/></H2></center>";

      html += "<body><center><H1>HUMIDITY<br/></H1></center>";
      html += "<center><H2>";
      html += (String)humidity;
      html += "%<br/></H2></center>";

      html += "<body><center><H1>SMO<br/></H1></center>";
      html += "<center><H2>";
      html += (String)smopercent;
      html += "%<br/></H2></center>";

      html += "</body></html>";
      espsend(html);
    }
    else
      Serial.println("! Incoming connection - sending MAIN webpage");
    String html = "";
    html += "<html>";
    html += "<body><center><H1>CONNECTED.<br/></H1></center>";
    html += "<center><a href='/SERA'><h4>INFO:Get Sensor Data</a></br><a href='/WATERING'>WATERING:Run Water Pump</a></h4></center>";
    html += "</body></html>";
    espsend(html);
    String closeCommand = "AT+CIPCLOSE=";  ////////////////close the socket connection////esp command
    closeCommand += connectionId; // append connection id
    closeCommand += "\r\n";
    sendData(closeCommand, 3000, DEBUG);

  }

}
//////////////////////////////sends data from ESP to webpage///////////////////////////

void espsend(String d)
{
  String cipSend = " AT+CIPSEND=";
  cipSend += connectionId;
  cipSend += ",";
  cipSend += d.length();
  cipSend += "\r\n";
  sendData(cipSend, 1000, DEBUG);
  sendData(d, 1000, DEBUG);
}

//////////////gets the data from esp and displays in serial monitor///////////////////////

String sendData(String command, const int timeout, boolean debug)
{
  String response = "";
  Serial1.print(command);
  long int time = millis();
  while ( (time + timeout) > millis())
  {
    while (Serial1.available())
    {
      char c = Serial1.read(); // read the next character.
      response += c;
    }
  }

  if (debug)
  {
    Serial.print(response); //displays the esp response messages in arduino Serial monitor
  }
  return response;
}
