


How to Use PicoBricks with Microblocks
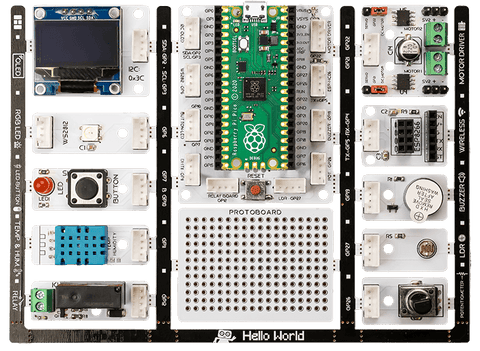
Pico Bricks is an electronic development board + software which is designed for use in maker projects. With ten detachable modules included, Pico Bricks can be used to create a wide variety of projects. It also includes a protoboard that you can use to add your own modules!
Pico Bricks is for everyone interested in electronics and coding. Beginners with no prior experience will find it easy to get started thanks to the modular hardware design, Scratch-like block coding environment, and simulator. Those with experience can dig more deeply into electronics or explore coding in Python. And even the most expert makers will appreciate how quickly they can explore ideas and create prototypes with Pico Bricks.
Unlike other boards, Pico Bricks has an incredible amount of flexibility for every level of makers! Bricks IDE has example codes for different scenarios.
Learn coding from zero to hero with MicroBlocks or the Pico Bricks’s drag-n-drop, block coding builder. MicroBlocks is the easiest coding experience ever created and widely known in the maker industry.
How to Use PicoBricks?
MicroBlocks Programming Language
MicroBlocks is a free, Scratch-like blocks programming language for learning physical computing with educational microcontroller boards such as the micro:bit, Adafruit Circuit Playground Express, and many others. MicroBlocks is a live environment. Click on a block and it runs immediately, right on the board.
Try out commands. See and graph sensor values in real time. No more waiting for code to compile and download. Want to display an animation while controlling a motor? No problem! MicroBlocks lets you write separate scripts for each task and run them at the same time. Your code is simpler to write and easier to understand. MicroBlocks runs on many different boards, but your scripts are portable. Buttons, sensors, and display blocks behave the same on all boards with the relevant hardware.Once you run the codes in MicroBlocks, you can disconnect the USB and feed the Picobricks with a different power source. The codes on the card will work automatically.
1) To code Picobricks with MicroBlocks, let’s open https://microblocks.fun/ in the browser (Google Chrome and Edge browsers are recommended).
2) You don’t need to install anything to run MicroBlocks in a Chrome or Edge browser; you can run the online editor by clicking the Run button in the menu at the top right of the screen.

3) From the MicroBlocks menu, click the MicroBlocks button.

4) Then click update firmware on board.

5) Select the card type by clicking RP2040 (Pico) from the drop-down list.

4) When the card is selected, the Firmware Install window will open. Click the Ok button and it will ask you to save the .uf2 type firmware file named vm_pico. Save this file to any location on your computer.

5) Then, while holding down the white BOOTSEL button on the Pico, connect the card to your computer.

6) When you insert the card, a new folder will open with the files inside. Copy the vm_pico.uf2 file you downloaded to this folder and wait a few seconds for the folder to close automatically.
Note: The steps up to this section are only valid for the first installation. You don’t need to repeat these steps for later use.
7) Clicking the Connect button will display the system USB ports where the micro devices are plugged in. In this window, you can connect Picobricks to MicroBlocks by selecting the Pico device and then clicking the Connect buttons. When the connection is successful, a green circle will appear behind the USB icon.

8) First, you need to import Picobricks’ library into the Microblocks editor. You have to click the Add Library button for this.

9) In the File Open window that opens, click the Kits and Boards button to open the list of devices that you can code with Microblocks.

10) Click PicoBricks.ubl from the drop-down list, and then click the Open button.

If all went well, the PicoBricks library and code blocks will be displayed in the Code blocks panel.


2 Comments
Hello,
Our technical team will help you through Freshdesk.