


PicoBricks Greeting!
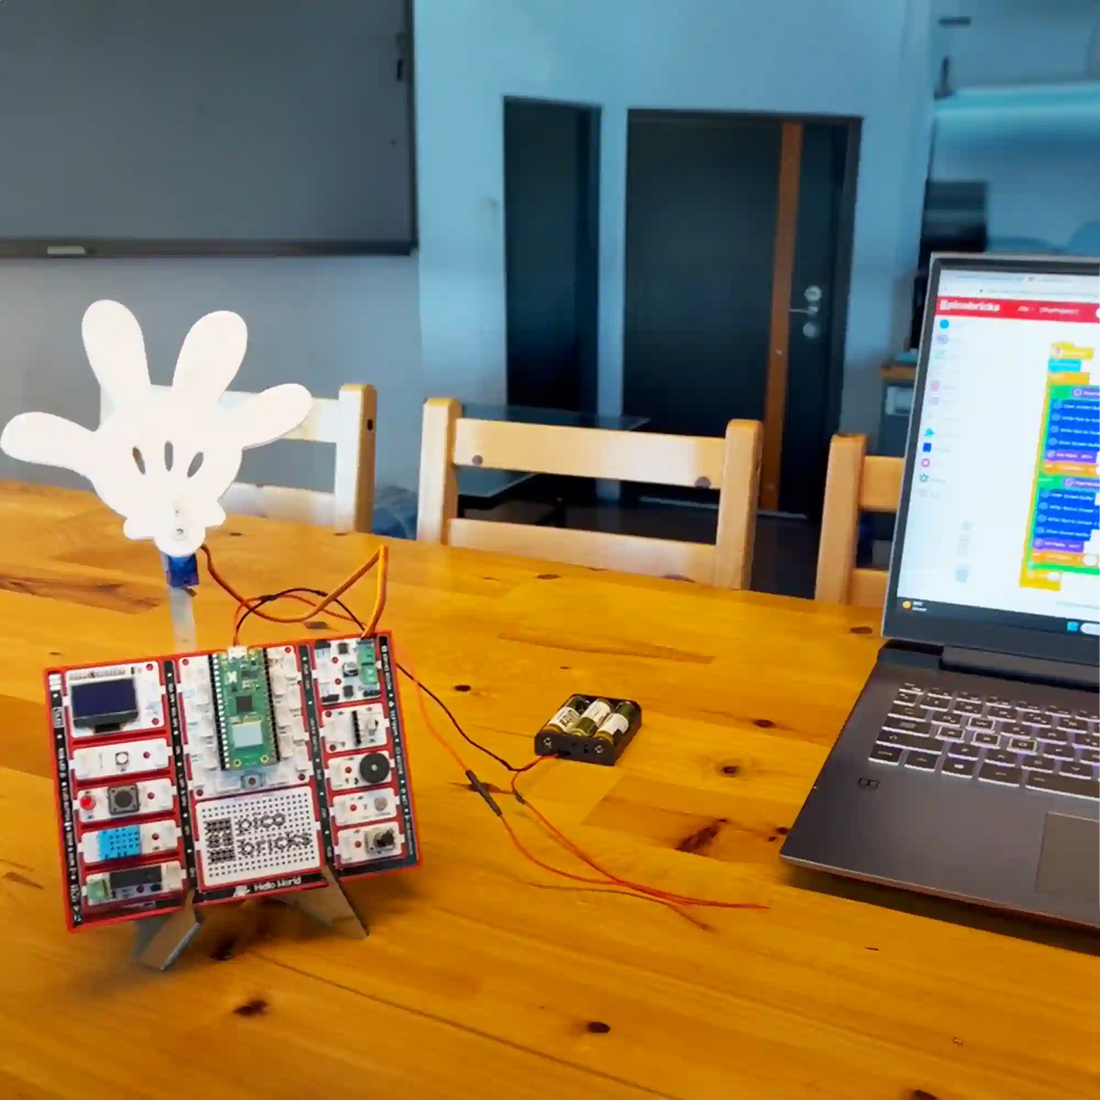
Table of Contents
Are you looking for coding games for beginners and all? You can start by greeting PicoBricks! But greeting is not a solo act. So, grab your PicoBricks and PicoBricks buddy, and dive into fun coding projects!
Details and Algorithm
In this coding game for beginners and all, a button serves as the trigger for initiating a greeting sequence. When the button is pressed, it activates a relay, which, in turn, supplies power to other PicoBricks modules connected to it. These PicoBricks are equipped with servo motors, which are programmed to create a waving motion.
The result is a friendly and interactive greeting mechanism. The button's role as a starting point ensures that the greeting is only initiated when intended, and the relay efficiently distributes power to the PicoBricks for synchronized motion.
This project combines hardware components and programming to produce an engaging and user-friendly greeting system.
Components
2 x PicoBricks
1 x Servo Motor
Battery Holder
Jumper Cables
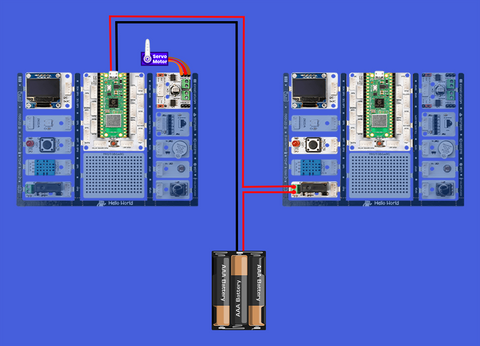
Wiring Diagram
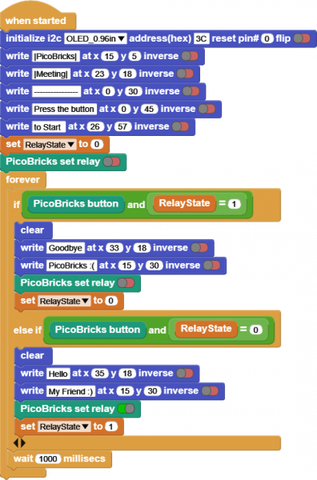
MicroBlocks Codes of PicoBricks
The code below is what PicoBricks says Hello to.
The code below should be written to the PicoBricks to which the hand in the STL file is connected. With this code, the servo motor connected to the hand will move and make a hand-waving motion.

PicoBricks IDE Codes of PicoBricks
The code below is what PicoBricks says Hello to.

The code below should be written to the PicoBricks to which the hand in the STL file is connected. With this code, the servo motor connected to the hand will move and make a hand-waving motion.

MicroPython Codes of PicoBricks
The code below is what PicoBricks says Hello to.
from time import sleep
from machine import Pin
from machine import I2C
from picobricks import SSD1306_I2C
import machine
import time

i2c = I2C(0, scl=Pin(5), sda=Pin(4), freq=200000)
oled = SSD1306_I2C(128, 64, i2c, addr=0x3c)
pin_button = machine.Pin(10, machine.Pin.IN)
pin = machine.Pin(12, machine.Pin.OUT)

oled.fill(0)
oled.text("{}".format("|PicoBricks|"), 15, 5)
oled.text("{}".format("|Meeting|"), 23, 18)
oled.text("{}".format("----------------"), 0, 30)
oled.text("{}".format("Press the button"), 0, 45)
oled.text("{}".format("to Start "), 26, 57)
oled.show()
relayState = 0
while (pin_button.value()) == (0):
    pass

while True:
    if (pin_button.value()) == (1) and relayState:
        oled.fill(0)
        oled.text("{}".format("Goodbye"), 33, 18)
        oled.text("{}".format("PicoBricks :("), 15, 30)
        oled.show()
        pin.off()
        relayState = 0
    elif (pin_button.value()) == (1) and relayState == (0):
        oled.fill(0)
        oled.text("{}".format("Hello"), 35, 18)
        oled.text("{}".format("My Friend :)"), 15, 30)
        oled.show()
        pin.on()
        relayState = 1
    time.sleep((0.2))
The code below should be written to the PicoBricks to which the hand in the STL file is connected. With this code, the servo motor connected to the hand will move and make a hand-waving motion.
from time import sleep
from machine import Pin
from machine import I2C
from picobricks import SSD1306_I2C
from machine import PWM
from math import fabs
import time

i2c = I2C(0, scl=Pin(5), sda=Pin(4), freq=200000)
oled = SSD1306_I2C(128, 64, i2c, addr=0x3c)
pwm_1 = PWM(Pin(21))
pwm_1.freq(50)
def CalculateAngle(angle):
   angle = fabs((angle * (6000 / 180)) + 2000)
   angle = round(angle)
   return angle

while True:
    oled.text("{}".format("HELLO :)"), 30, 30)
    pwm_1.duty_u16(CalculateAngle(60))
    time.sleep((0.2))
    pwm_1.duty_u16(CalculateAngle(120))
    time.sleep((0.2))
Arduino C Codes of PicoBricks
The code below is what PicoBricks says Hello to.
#include
#include
#include
#include "ACROBOTIC_SSD1306.h"

#define PICO_BUTTON 10
#define RELAY 12
bool state = false;

void setup() {
  Serial.begin(115200);
  pinMode(PICO_BUTTON,INPUT);
  pinMode(RELAY,OUTPUT);
  Wire.begin();
  oled.init();
  oled.clearDisplay();
  oled.setTextXY(1,3);
  oled.putString("PicoBricks");

  oled.setTextXY(3,4);
  oled.putString("Meeting");

  oled.setTextXY(5,0);
  oled.putString("Press the button");

  oled.setTextXY(7,3);
  oled.putString("to Start");

}

void loop() {

  if(state == false && digitalRead(PICO_BUTTON) == HIGH){
    digitalWrite(RELAY,HIGH);
    oled.clearDisplay();
    oled.setTextXY(3,5);
    oled.putString("Hello");
    oled.setTextXY(5,2);
    oled.putString("My Friend :)");
    state = true;
    delay(100);
    }else if (state == true && digitalRead(PICO_BUTTON) == HIGH){
      digitalWrite(relay,LOW);
      oled.clearDisplay();
      oled.setTextXY(3,4);
      oled.putString("Goodbye");

      oled.setTextXY(5,2);
      oled.putString("PicoBricks :(");

      state = false;
      delay(100);
      }
}
The code below should be written to the PicoBricks to which the hand in the STL file is connected. With this code, the servo motor connected to the hand will move and make a hand-waving motion.
#include
#include
#include
#include "ACROBOTIC_SSD1306.h"

Servo servo1;

void setup() {
  //define dht sensor and Oled screen
  Serial.begin(115200);
  servo1.attach(21);
  Wire.begin();
  oled.init();
  oled.clearDisplay();
  oled.setTextXY(3,5);
  oled.putString("Hello");

  oled.setTextXY(5,3);
  oled.putString("PicoBricks");
}

void loop() {
  servo1.write(120);
  delay(200);
  servo1.write(45);
  delay(200);
}