


Count Up Project
Table of Contents
Hey, have you ever tried your hand at DIY electronics? It’s like a playground where you can let your creativity run wild. And let me tell you, the coolest projects are the ones that just pop into your head. Today, we’re diving into something seriously exciting: the servo motor. It may not look like much, but this little gadget can do some serious heavy lifting and open up a whole new world of possibilities. With the DIY electronics kit like Picobricks platform and a trusty servo motor, you’re ready to create some seriously genius stuff, starting with your very own timer. Whether you want to make a game clock or a precision stopwatch, this dynamic duo has got your back and can turn your vision into reality. So, let’s hop aboard and embark on this awesome journey together!
Count Up Timer
A count-up timer is a type of timer that typically counts the elapsed time from the start of an event or process. It displays the elapsed time in seconds, minutes, hours, or larger time intervals. For example, it can be used to track the time elapsed during a sports event or measure the completion time of a project. This type of timer uses a continuously increasing counter from the starting point to show how much time has passed.
Details and Algorithm
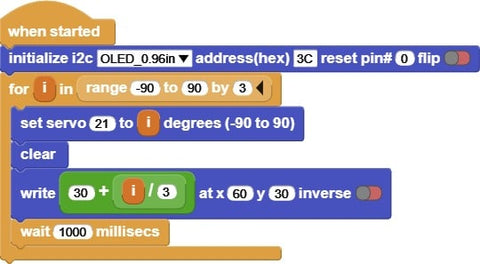
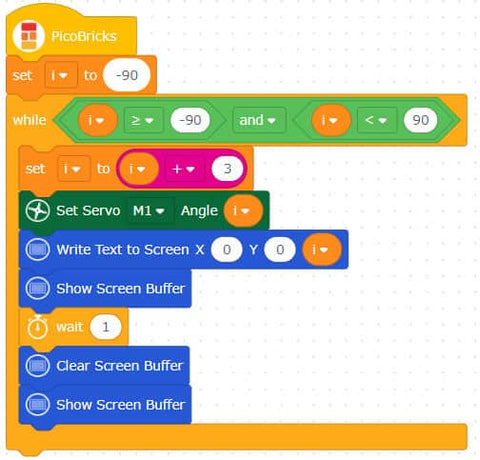
You can use a servo motor to count from 0 to 60 seconds. The arrow on the servo moves 3 degrees every second. It’s perfect for making a game clock or stopwatch. Just hit the button to stop the timer. And if you wanna switch it up and count down instead of up, just make a little tweak. if you want to try flip the range block from -90 to 90 to 90 to -90, the arrow will move the other way.
Components
Wiring Diagram

MicroBlocks Code of The Count Up
PicoBricks Code of The Count Up
from time import sleep
from machine import Pin
from machine import PWM
from math import fabs
from machine import I2C
from picobricks import SSD1306_I2C
import time
pwm_1 = PWM(Pin(21))
pwm_1.freq(50)
def CalculateAngle(angle):
   angle = fabs((angle * (6000 / 180)) + 2000)
   angle = round(angle)
   return angle
i2c = I2C(0, scl=Pin(5), sda=Pin(4), freq=200000)
oled = SSD1306_I2C(128, 64, i2c, addr=0x3c)
i = -90
while i >= (-90) and i < (90):
    i = i + (3)
    pwm_1.duty_u16(CalculateAngle(i))
    oled.text("{}".format(i), 0, 0)
    oled.show()
    time.sleep((1))
    oled.fill(0)
    oled.show()
#include
#include
#include “ACROBOTIC_SSD1306.h”
#define BUTTON_PIN 10
Servo servo;

void setup() {
  pinMode(BUTTON_PIN, INPUT);
  Wire.begin(); // SDA, SCL
  servo.attach(21);
  oled.init();
  oled.clearDisplay();
  Serial.begin(9600);
}

void loop() {
    for(int i=-90;i>=-90 && i<=90; i+=3 ){
    if(digitalRead(BUTTON_PIN)==1){
      break;}
    oled.clearDisplay();
    oled.setTextXY(4, 7);
    oled.putString(String(30+ i/3));
    servo.write(i);
    delay(1000);
     }
}