Skip to content
Wish Lists Cart
0 items

#4 Thermometer Project With PicoBricks

26 Nov 2023
#4 Thermometer Project With PicoBricks
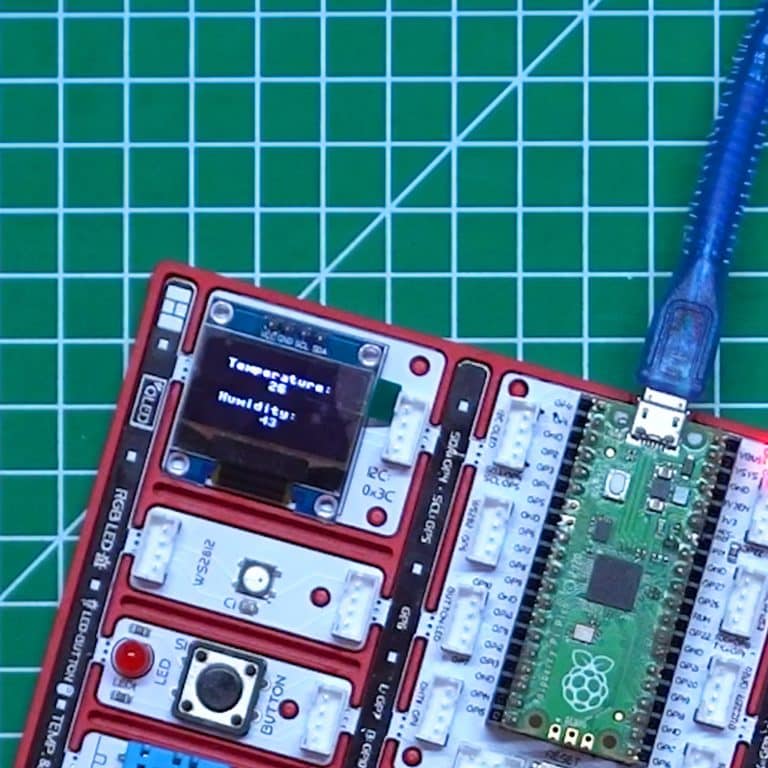
In the "Thermometer Monitor Project Using Raspberry Pi Kit", we utilize the Picobricks Raspberry Pi kit to measure and display environmental temperature and humidity. This project involves block programming to write Python code, providing a hands-on learning experience in using humidity and temperature sensors. You'll learn to monitor and see the temp and humidity data on a monitor, enhancing your understanding of Python programming and sensor integration.


Sensors are the sense organs of electronic systems. We use our skin to feel, our eyes to see, our ears to hear, our tongue to taste, and our nose to smell. There are already many sense organs (sensors) in the picobrix. Also, new ones can be added. You can interact with the environment using humidity, temperature, light and many more sensors. Picobricks can measure the ambient temperature without the need for any other environmental component.

Ambient temperature is used in greenhouses, incubators, in environments used for the transport of drugs, briefly in situations where the temperature change must be constantly monitored. If you are going to do an operation on temperature change in your projects, you should know how to measure the ambient temperature. In this project, you will prepare a thermometer with Picobricks that will display the ambient temperature on the OLED screen.

Project Video

Details and Algorithm

Picobricks has a DHT11 module. This module can sense the temperature and humidity in the environment and send data to the microcontroller. In this project, we will write the necessary codes to print the temperature values ​​measured by the DHT11 temperature and humidity sensor on the OLED screen.

Components

1X PicoBricks

Wiring Diagram

You can code and run Picobricks’ modules without wiring. If you are going to use the modules by separating them from the board, you should make the module connections with grove cables.

MicroBlocks Codes of the PicoBricks

You can access the Microblocks codes of the project by dragging the image to the Microblocks Run tab or click the button

MicroPython Codes of the PicoBricks


from machine import Pin,I2C,ADC #to acces the hardware picobricks
from picobricks import SSD1306_I2C, DHT11 #oled library
import utime #time library
#to acces the hardware picobricks
WIDTH=128
HEIGHT=64
#define the weight and height picobricks
sda=machine.Pin(4)
scl=machine.Pin(5)
#we define sda and scl pins for inter-path communication
i2c=machine.I2C(0, sda=sda, scl=scl, freq=2000000)#determine the frequency values
oled=SSD1306_I2C(128, 64, i2c)
pico_temp=DHT11(Pin(11))
current_time=utime.time()
while True:
    if(utime.time() - current_time > 2):
        current_time = utime.time()
        pico_temp.measure()
        oled.fill(0)#clear OLED
        oled.show()
        temperature=pico_temp.temperature
        humidity=pico_temp.humidity
        oled.text("Temperature: ",15,10)#print "Temperature: " on the OLED at x=15 y=10
        oled.text(str(int(temperature)),55,20)
        oled.text("Humidty: ", 15,40)
        oled.text(str(int(humidity)),55,50)
        oled.show()#show on OLED
        utime.sleep(0.5)#wait for a half second

Arduino C Codes of the PicoBricks


#include <Wire.h>
#include <DHT.h>
#include "ACROBOTIC_SSD1306.h"
#define DHTPIN 11
#define DHTTYPE DHT11
//define the library

DHT dht(DHTPIN, DHTTYPE);
float temperature;
//define the temperature variable

void setup() {
  //define dht sensor and Oled screen
  Serial.begin(115200);
  dht.begin();
  Wire.begin();  
  oled.init();                      
  oled.clearDisplay(); 
}

void loop() {
  temperature = dht.readTemperature();
  Serial.print("Temp: ");
  Serial.println(temperature);
  oled.setTextXY(3, 1);              
  oled.putString("Temperature: ");
  //print "Temperature: " on the OLED at x=3 y=1
  oled.setTextXY(4, 3);              
  oled.putString(String(temperature));
  //print the value from the temperature sensor to the OLED screen at x=4 y=3
  Serial.println(temperature);
  delay(100);
}
GitHub Project Page
Prev Post
Next Post

Thanks for subscribing!

This email has been registered!

Shop the look
Choose Options

Edit Option

Have Questions?

Back In Stock Notification

Compare

Product SKURatingDescription Collection Availability Product Type Other Details
this is just a warning
Login
Shopping Cart
0 items
Same Day Shipping No Extra Costs
Easy Returns Guarantee Return with Ease
Secure Checkout Secure Payment